How to Use the LangGraph CLI to Build and Run an Agent Server in Docker
Every LangGraph CLI command run for real on version 0.4.33, from langgraph new to a Docker image, plus the two traps the docs skip: a build that copies your .env file and a Python 3.11 default base image.

Table of Contents
When I built a LangGraph project with the LangGraph CLI and no .dockerignore, my .env file ended up inside the Docker image. This guide walks the whole CLI, from langgraph new to a deployable image, and shows how to close that hole and one other. Steps 1 to 6 cost nothing and need no account. It's for Python developers who already have a graph and now need to serve it over HTTP.
I ran every command below on October 10, 2026, with langgraph-cli 0.4.33, langgraph 1.2.14 and langgraph-api 0.16.0. The output blocks are copied from that run, not from the docs. The second trap: the default base image is Python 3.11, whatever Python you develop on.
Before you start
- Python 3.11 or newer. The CLI installs on 3.10, but the dev server package (
langgraph-api) requires 3.11 or later. - Docker with the daemon running, for
build,upand localdeploybuilds.devanddockerfiledon't need it. - uv or pip. I use uv. Step 1 shows the pip equivalent.
- A LangSmith API key, only for
langgraph upandlanggraph deploy. Steps 1 to 6 need no account at all. - Cost: $0 locally. Deploying to LangSmith needs the Plus plan at $39 per seat per month, which includes one free small serverless deployment (LangChain pricing).
The commands map to stages of a project, and each stage needs more than the one before it. The diagram below shows the order I use them in.
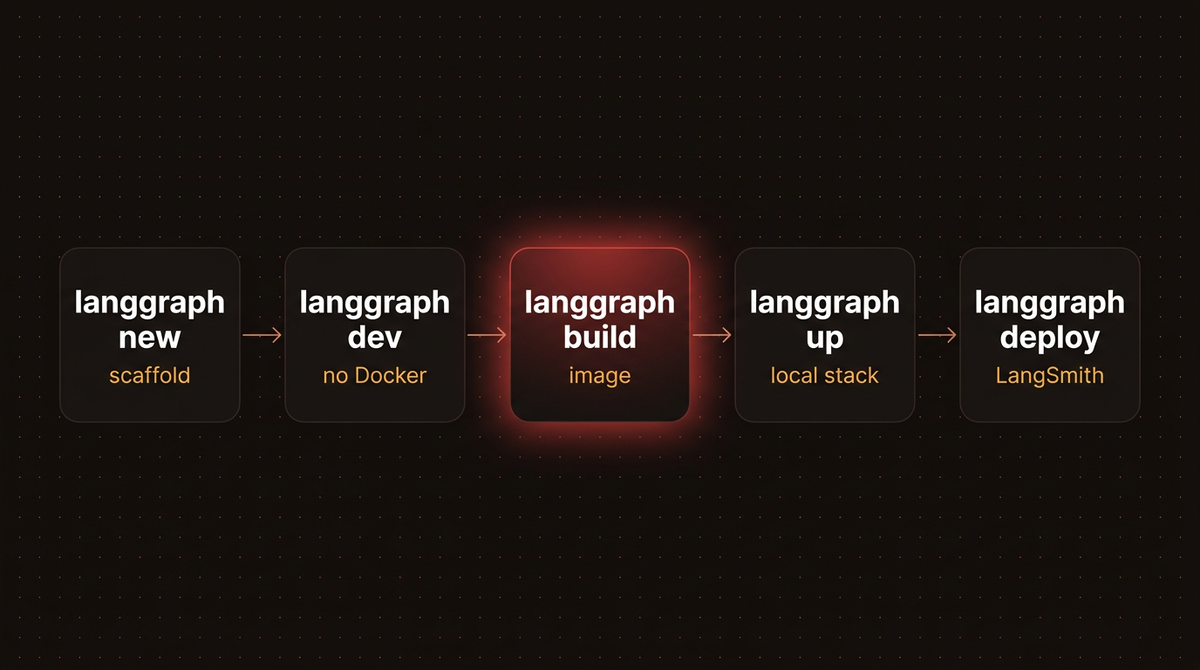
langgraph build runs without Docker or an account. The build step is where your folder's contents become a shippable artifact, so it's where most mistakes get baked in.Step 1: Install the LangGraph CLI with the dev server extra
The package comes in two sizes. Plain langgraph-cli gives you build, up, dockerfile and deploy. The [inmem] extra adds the local server that langgraph dev runs. Install it into a fresh virtual environment:
uv venv -p 3.12 .venv
source .venv/bin/activate
uv pip install "langgraph-cli[inmem]" langgraph
langgraph --version
Without uv, the same thing is python3 -m venv .venv, then source .venv/bin/activate and pip install "langgraph-cli[inmem]" langgraph. You should see LangGraph CLI, version 0.4.33 or newer. Run langgraph --help and check that the list includes dev, build, up, dockerfile, deploy, new and validate. The validate command doesn't appear in the quick commands table of the official CLI reference, but it's there and it's useful.
Step 2: Scaffold a project with langgraph new
Run langgraph new with an explicit template so you skip the interactive prompt:
langgraph new --template new-langgraph-project-python triage-agent
cd triage-agent
The CLI downloads the new-langgraph-project repo as a zip. The templates on offer in 0.4.33 are new-langgraph-project-python, agent-python, deep-agent-python, new-langgraph-project-js and deep-agent-js. The file that matters is langgraph.json, which every other command reads:
{
  "$schema": "https://langgra.ph/schema.json",
  "dependencies": ["."],
  "graphs": {
    "agent": "./src/agent/graph.py:graph"
  },
  "env": ".env",
  "image_distro": "wolfi"
}
graphs maps a graph ID (here agent) to a file and variable. That ID becomes the assistant_id you call over HTTP. dependencies: ["."] tells the build to install the folder's pyproject.toml. And image_distro: "wolfi" picks the base image the docs recommend as smaller and more secure.
Step 3: Put your graph in and validate langgraph.json
Replace src/agent/graph.py with your own graph. For this guide I used a ticket router that calls no model, so you can run every step without an API key or a bill. Swap the classify function for a model call once the plumbing works.
from typing import Literal
from langgraph.graph import END, START, StateGraph
from typing_extensions import TypedDict


class State(TypedDict, total=False):
    message: str
    route: str
    reply: str


def classify(state: State) -> State:
    text = state["message"].lower()
    if any(w in text for w in ("invoice", "refund", "charge", "billing")):
        return {"route": "billing"}
    if any(w in text for w in ("error", "crash", "broken", "bug")):
        return {"route": "bug"}
    return {"route": "general"}


def pick(state: State) -> Literal["billing", "bug", "general"]:
    return state["route"]


def billing(state: State) -> State:
    return {"reply": "Sent to billing. Expect an answer within one business day."}


def bug(state: State) -> State:
    return {"reply": "Logged as a bug. Please include the exact error text."}


def general(state: State) -> State:
    return {"reply": "Thanks, a person will read this today."}


builder = StateGraph(State)
for name, fn in (("classify", classify), ("billing", billing),
                 ("bug", bug), ("general", general)):
    builder.add_node(name, fn)
builder.add_edge(START, "classify")
builder.add_conditional_edges("classify", pick)
for node in ("billing", "bug", "general"):
    builder.add_edge(node, END)

graph = builder.compile(name="Ticket Triage")
Export the compiled graph, not the builder. The Agent Server docs recommend this because the server loads a compiled graph once at startup and reuses it for every run. Then check the config:
langgraph validateConfiguration file .../triage-agent/langgraph.json is valid. (1 graph found)
warning: Unknown key '$schema' is not a recognized config field.That warning comes from the template's own $schema line and is harmless: the key only gives your editor autocomplete. A real problem, such as a wrong path in graphs, fails here in a second instead of halfway through a Docker build.
Step 4: Run the graph locally with langgraph dev
Install the project into your environment, then start the dev server:
uv pip install -e .
langgraph dev --no-browser
- API: http://127.0.0.1:2024
- Studio UI: https://smith.langchain.com/studio/?baseUrl=http://127.0.0.1:2024
- API Docs: http://127.0.0.1:2024/docs
This in-memory server is designed for development and testing.This is the same Agent Server API you'd get in production: assistants, threads, runs and state, served from one Python process with hot reloading. It saves state to a .langgraph_api folder in your project (data storage docs), which matters again in step 5. If you want the visual debugger on top of it, my LangGraph Studio setup guide covers that side.
Prove it works over HTTP rather than trusting the banner. Create a thread, then run the graph on it and wait for the result:
THREAD=$(curl -s -X POST http://127.0.0.1:2024/threads \
  -H "Content-Type: application/json" -d '{}' | jq -r .thread_id)

curl -s -X POST http://127.0.0.1:2024/threads/$THREAD/runs/wait \
  -H "Content-Type: application/json" \
  -d '{"assistant_id": "agent", "input": {"message": "I was charged twice on my last invoice"}}'
{"message":"I was charged twice on my last invoice","route":"billing","reply":"Sent to billing. Expect an answer within one business day."}No jq? Copy the thread_id value from the first response by hand. A GET /threads/$THREAD/state returns the same values plus metadata, including "langgraph_api_version":"0.16.0". If the run hangs here, it'll hang in Docker too, so fix it now.
Step 5: Add a .dockerignore before you build anything
The template ships without a .dockerignore, and the generated Dockerfile starts with ADD . /deps/triage-agent, which copies the entire folder into the image. Docker reads .dockerignore, not .gitignore (Docker build context docs).
Plenty of people keep their virtual environment inside the project folder, so I tested that case. I created a .venv in triage-agent/, ran langgraph build -t triage-agent:withvenv with no .dockerignore, then listed what landed in the image:
docker run --rm --entrypoint ls triage-agent:withvenv -a /deps/triage-agent. .. .codespellignore .env .env.example .github .gitignore .langgraph_api .venv Dockerfile LICENSE Makefile README.md agent.egg-info langgraph.json pyproject.toml src static tests uv.lockWarning: .env is in that list. Every API key in it is now inside an image you might push to a registry. The .langgraph_api folder came along too, carrying the threads from your local test runs.
Create the file in the project root:
.venv
.env
.langgraph_api
__pycache__
.git
tests
I rebuilt with exactly that file and the same Python 3.12 base (step 6 shows how to pin it). The image dropped from 1.04 GB to 848 MB, and .env, .venv and .langgraph_api were all gone from /deps/triage-agent. Secrets belong in the runtime environment (the env key, docker run -e or your platform's secret store), never in a layer.
Step 6: Pin the Python version and build the image
Look at the first line of the Dockerfile the CLI generates:
langgraph dockerfile Dockerfile
head -1 Dockerfile
FROM langchain/langgraph-api:3.11-wolfiI developed on Python 3.12, and the image still targets 3.11. The CLI reference confirms python_version accepts 3.11, 3.12 or 3.13 and defaults to 3.11. Code that uses newer syntax or a package that dropped 3.11 will pass every local test and then fail in the container. Add the key to langgraph.json to match what you develop on:
"python_version": "3.12"Run langgraph dockerfile Dockerfile again and the base becomes langchain/langgraph-api:3.12-wolfi. The Dockerfile you wrote is only for reading or for your own pipeline; langgraph build generates its own, so delete it if you don't need it. Now build:
langgraph build -t triage-agent:localOn my Mac mini the very first build (on the default 3.11 base) took 39 seconds, and a rebuild with cached layers took 10. Both ended with Successfully tagged triage-agent:local. Check it with docker images triage-agent and confirm the interpreter with docker run --rm --entrypoint python triage-agent:local --version, which printed Python 3.12.15 after the pin. Pass --platform linux/amd64 if you build on Apple silicon for an x86 server.
If your project has a uv.lock, consider "source": {"kind": "uv"} in place of dependencies. The docs note that dependencies: ["."] resolves packages again at build time and ignores the lockfile, so two builds a week apart can ship different versions.
Step 7: Start the full stack with langgraph up
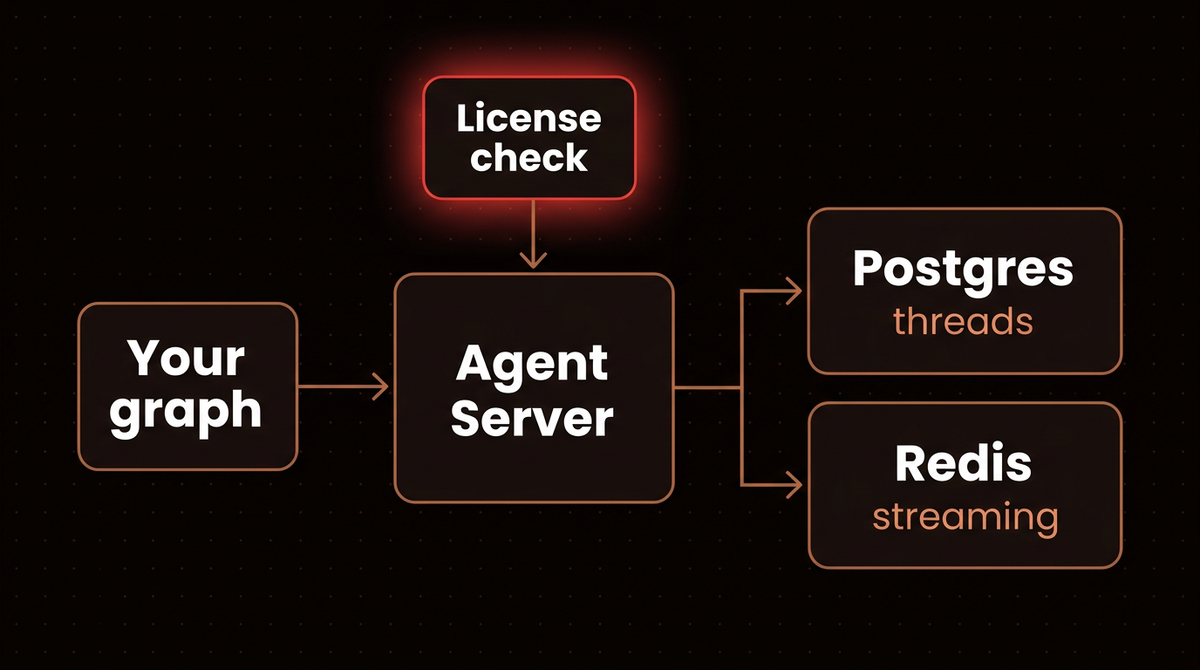
langgraph up runs your production image locally. It builds the image and starts three containers: the Agent Server, Postgres for threads and checkpoints, and Redis, which the Agent Server docs describe as carrying signalling, cancellation and streaming between API servers and queue workers.
export LANGSMITH_API_KEY=lsv2_...
langgraph up --wait --port 8123
I ran it without a key first, because I wanted to see the failure you'd hit. Postgres and Redis came up healthy, then the API container exited with code 3. Its log, via docker logs triage-agent-langgraph-api-1:
ValueError: License verification failed. Please ensure proper configuration:
- For local development, set a valid LANGSMITH_API_KEY for an account with LangGraph Cloud access in the environment defined in your langgraph.json file.
- For production, configure the LANGGRAPH_CLOUD_LICENSE_KEY environment variable with your LangGraph Cloud license key.
So up is not a free way to self host. The local development guide says it needs a LangSmith API key for local testing and a license key for production use. I had no LangSmith key on this machine, so I couldn't confirm whether a key from the free Developer plan passes the check. The error message asks for "an account with LangGraph Cloud access", so test your key here before you plan around it. With a valid key in .env (which langgraph.json already points at) or exported in your shell, the server answers on http://localhost:8123. The same runs/wait call from step 4 works against it. Run langgraph up --recreate before you deploy anything, so you test a fresh build and not cached containers.
Here's how the commands compare on what they need and where state ends up:
| Command | Needs Docker | Needs an account | Default port | State lives in |
|---|---|---|---|---|
langgraph dev | No | No | 2024 | .langgraph_api folder |
langgraph dockerfile | No | No | None | None |
langgraph build | Yes | No | None | None |
langgraph up | Yes | LangSmith key, or a license for production | 8123 | Postgres container |
langgraph deploy | Optional (builds remotely without it) | LangSmith key with Deployments access | Managed | Managed Postgres |
Step 8: Deploy with langgraph deploy
langgraph deploy builds the image, pushes it to a managed registry and creates or updates a LangSmith deployment in one command. It's marked beta, and the CLI reference says it isn't yet supported on LangSmith Cloud hosted in AWS. The key needs access to Deployments, which the pricing page lists on Plus and above, not on the free Developer plan. If Docker isn't installed, it builds remotely. The .dockerignore from step 5 still applies, because the build reads the same folder.
langgraph deploy --name triage-agent
langgraph deploy logs --name triage-agent --follow
langgraph deploy list
LangChain's own walkthrough shows the full loop, from scaffold to Studio to a live deployment:
If you host somewhere else, stop at step 6. Your image is a normal container. But read step 7 again first: the Agent Server inside it still runs the license check, so self hosting it in production means a license key, not just a server. LangChain's pricing page lists self hosted deployment under the Enterprise plan.
Troubleshooting the LangGraph CLI
Error: Required package 'langgraph-api' is not installed. You installed plain langgraph-cli and ran langgraph dev. I reproduced this in a clean environment, and the CLI prints the fix itself: pip install -U "langgraph-cli[inmem]".
The API container exits with code 3 after langgraph up. Postgres and Redis show healthy, the server doesn't. That's the license check in step 7. Run docker logs on the API container and you'll see License verification failed. Set LANGSMITH_API_KEY in the env file named in langgraph.json.
Port already in use. up wants 8123, 5432 and 6379, per the local development guide. Check with lsof -i :5432. A local Postgres is the usual offender. Move the API with --port, or point at an existing database with --postgres-uri.
"Docker Compose requires buildx plugin to be installed." I got this warning during up and the build still finished. It's safe to ignore locally. Install buildx if you need multi platform builds.
The image works locally and breaks in production on import. Check the first FROM line. If it says 3.11 and you develop on something newer, set python_version (step 6).
A graph change doesn't show up in up. Unlike dev, up doesn't hot reload unless you pass --watch. Use --recreate to force a rebuild.
What it costs once deployed, and when to skip it
Beyond the free serverless deployment on Plus, LangSmith meters runtime compute at 0.0675 LSU per vCPU hour, and one LSU costs $1.00, per the pricing page. The same page's FAQ says serverless deployments scale to zero when idle and recommends dedicated deployments for any customer facing agent.
Most CLI commands also send one analytics event with your OS, Python version, CLI version and the command name, according to the data storage docs linked in step 4. Set LANGGRAPH_CLI_NO_ANALYTICS=1 to turn it off. On anything regulated, I'd set it in the shell profile on day one.
If you'd rather run plain LangGraph inside your own FastAPI service, you give up the Agent Server API and manage the checkpointer yourself. My guide to the LangGraph checkpointer on Postgres covers that route. Durable pauses for approval are in adding human approval to a LangGraph workflow.
And when not to use it at all: if your agent is one request in and one response out, with no threads, no background runs and no streaming, the Agent Server is more machinery than you need. A small API around graph.invoke() is simpler, and it has no license check. I reach for the CLI when the project needs threads that survive restarts and runs that keep going after the HTTP call returns. If you're still deciding whether LangGraph fits at all, start with LangChain versus LangGraph or the broader LangGraph production tutorial. Once it's deployed, turn on tracing before real traffic arrives.
If you'd rather have an agent like this built, deployed and monitored for you, I do that for businesses: see how I build AI agents.
Frequently asked questions
What is the LangGraph CLI?
It's the official command line tool for running LangGraph graphs as an Agent Server. It scaffolds projects (new), runs a local dev server (dev), builds Docker images (build), generates Dockerfiles (dockerfile), starts a local Postgres and Redis stack (up) and deploys to LangSmith (deploy). Every command reads a langgraph.json file in the project folder.
What is the difference between langgraph dev and langgraph up?
langgraph dev runs the server as one Python process with hot reloading on port 2024, saves state to a local folder and needs neither Docker nor an account. langgraph up builds a Docker image and runs it with Postgres and Redis on port 8123. It needs Docker and a LangSmith API key, and it is the closer match to production.
Is the LangGraph CLI free?
The CLI is open source on PyPI, and dev, dockerfile and build work without any account. langgraph up needs a LangSmith API key, and production self hosting needs a license key. Deploying to LangSmith needs the Plus plan at $39 per seat per month, which includes one free small serverless deployment.
How do I install langgraph-cli?
Run pip install "langgraph-cli[inmem]" in a Python 3.11 or newer environment if you want the local dev server. Plain pip install langgraph-cli is enough for build, up and deploy, but langgraph dev will then fail with a missing langgraph-api error. Check the install with langgraph --version.
Can I self host a LangGraph CLI image without LangSmith?
You can build and run the image anywhere Docker runs, but the Agent Server inside it checks for a license when it starts. In my test it exited with "License verification failed" when no key was set. The docs say local testing works with a LangSmith API key. Production self hosting needs a LangGraph license key, and LangChain lists self hosted deployment under its Enterprise plan.
Published
October 10, 2026
Category
AI Agents
Jahanzaib Ahmed
AI Systems Engineer & Founder
AI Systems Engineer with 126 production systems shipped. I run AgenticMode AI (AI agents, RAG systems, voice AI) and ECOM PANDA (ecommerce agency). I build AI that works in the real world for businesses across home services, healthcare, ecommerce, SaaS, and real estate.
Related articles

How to Use MCP Servers in LangGraph (and Serve a Graph as One)
Connect a LangGraph agent to MCP servers with langchain.mcp, then serve your own graph over /mcp. Every example was run on LangGraph 1.2.14, with the old adapters package covered too.
How toAI AgentsLangGraph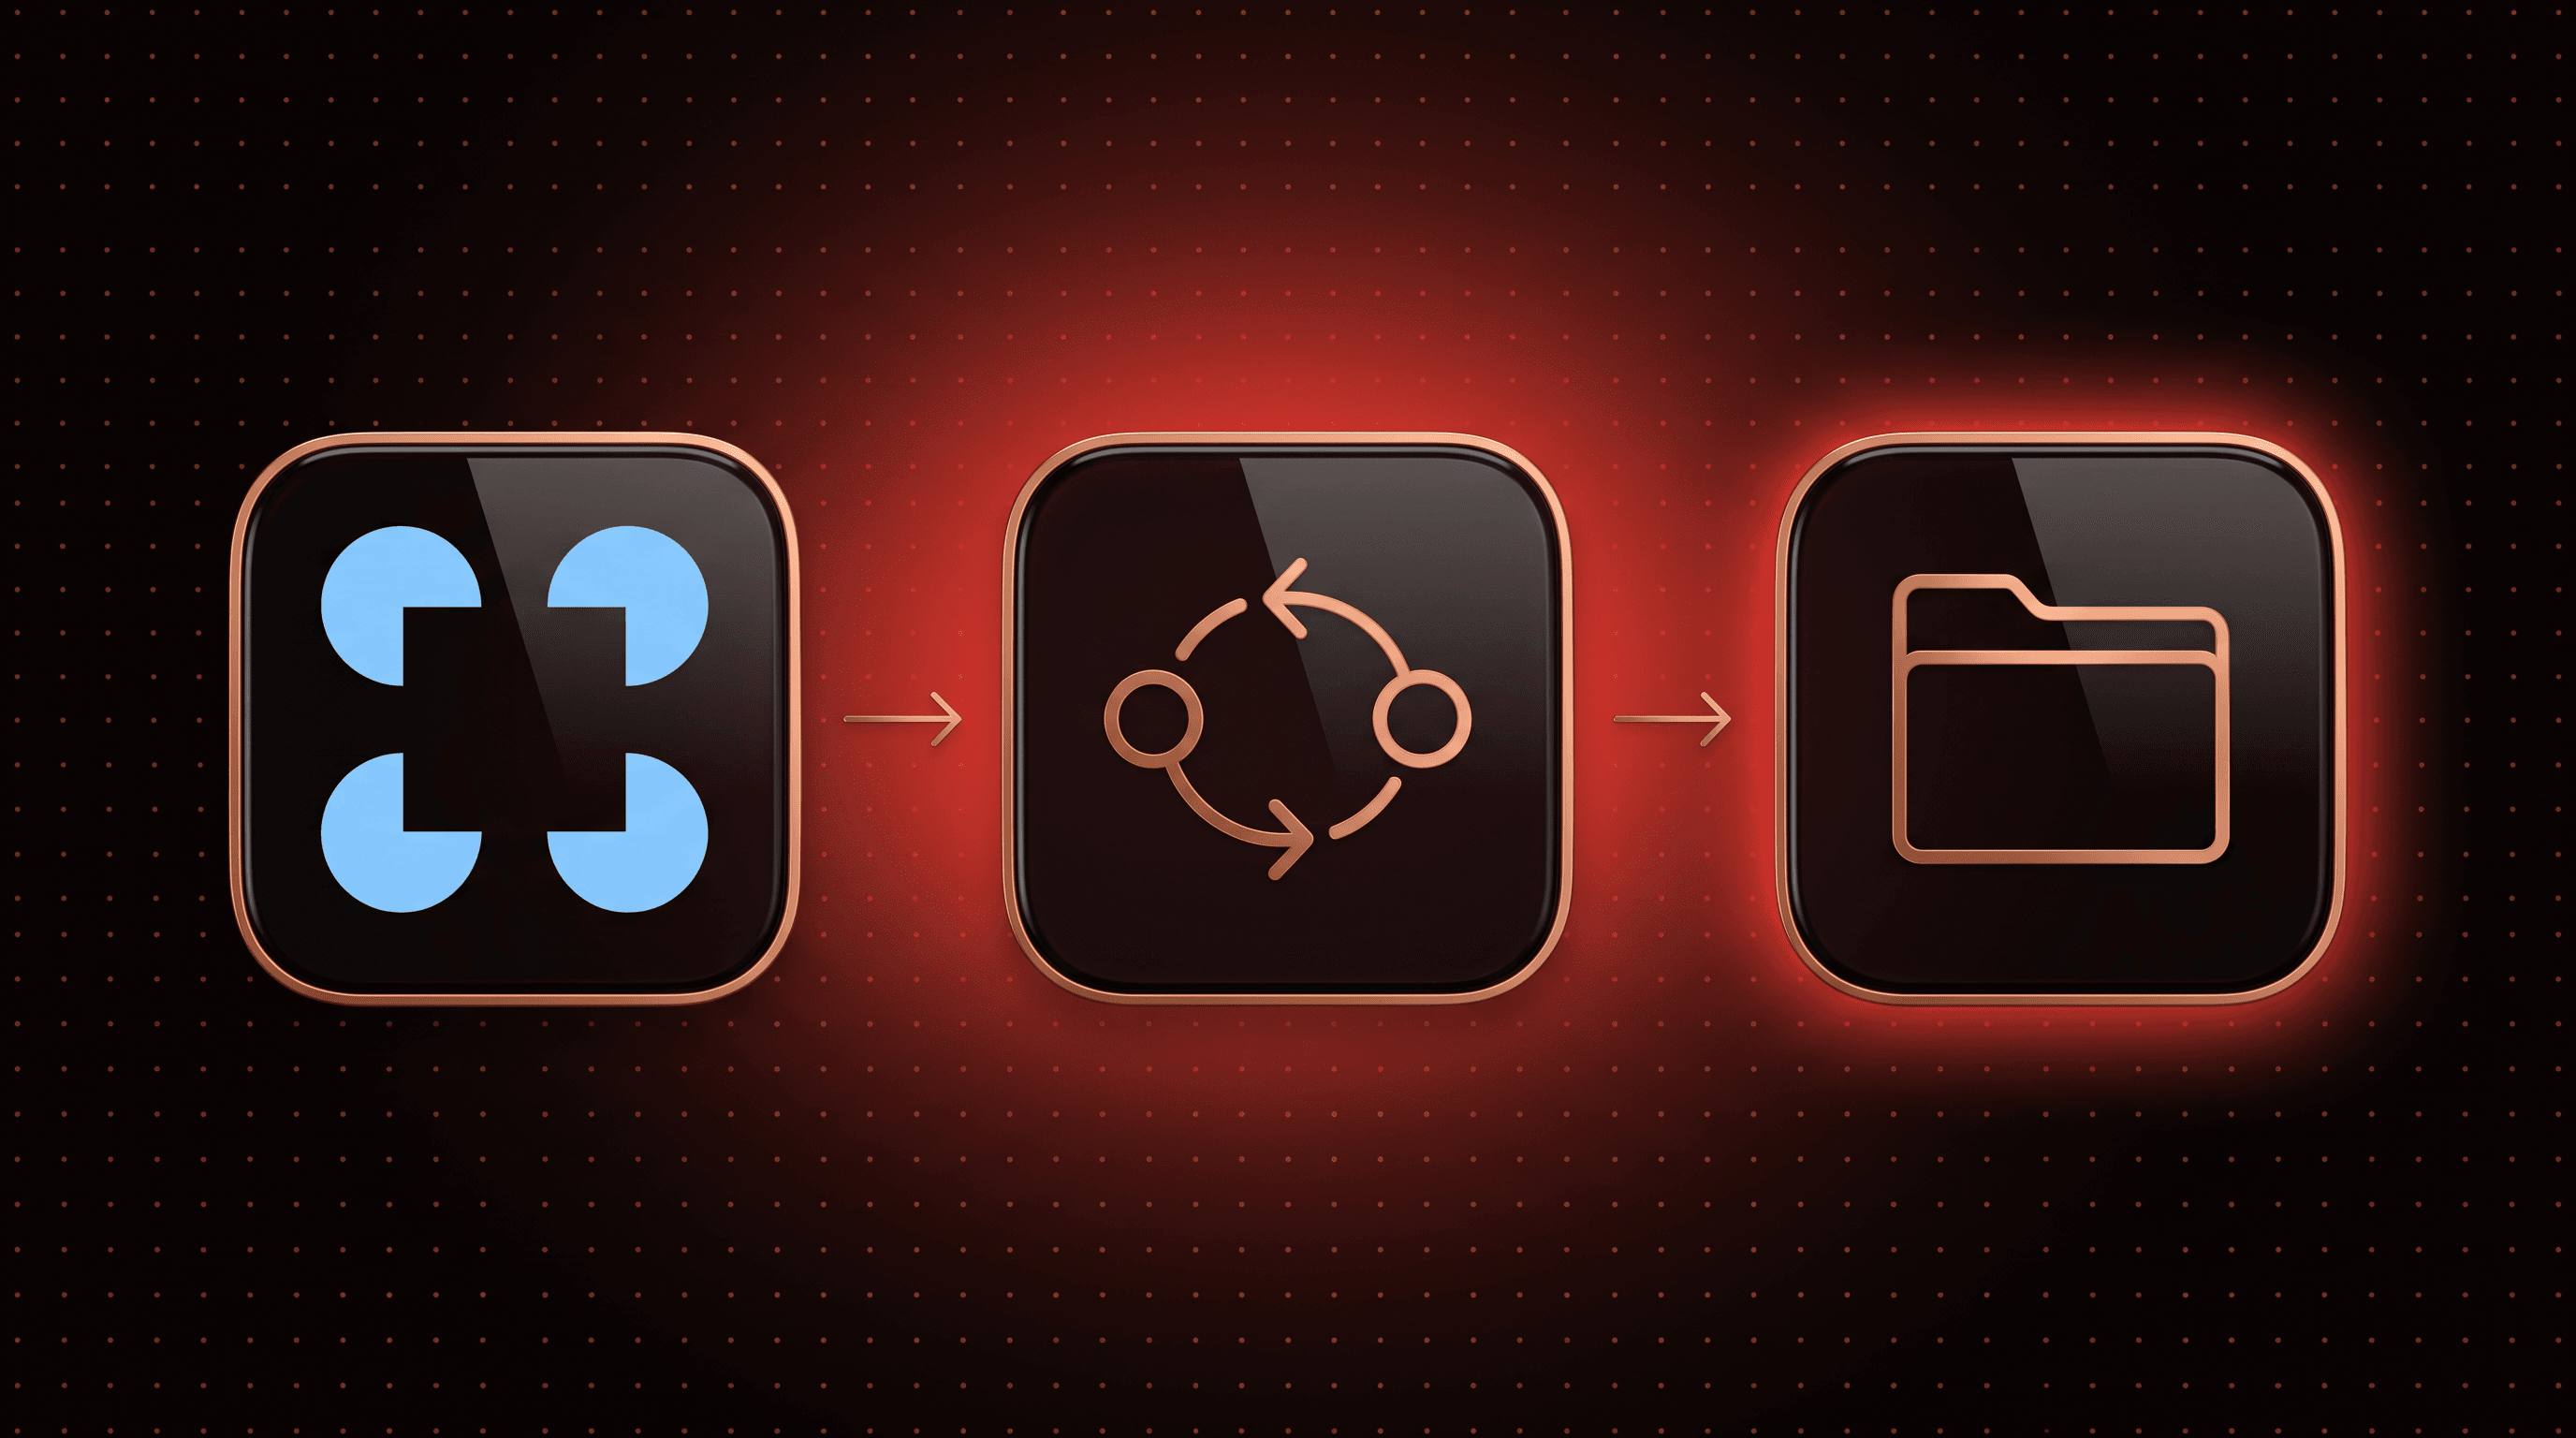
How to Inspect LangGraph Deep Agents: What create_deep_agent Adds
See what LangGraph deep agents add to a graph, tested offline on deepagents 0.7.22: the default tools, files in state, subagents, approvals, and the planning tool that is now opt in.
How toAI AgentsLangGraph
How to Run LangGraph Examples With Real Output
Seven small LangGraph examples that run offline on 1.2.14: routing, a loop with a limit, Send, human approval, an agent with tools, a subgraph with streaming, and Command with memory, with real output.
How toAI AgentsLangGraph