How to Build a LangGraph JS Agent in TypeScript and Test It Without Tokens
Build a LangGraph JS agent in TypeScript with a tool, per user memory, streaming and the local dev server, plus a zero token test harness. Every command was run on LangGraph 1.4.21.

Table of Contents
This guide builds a LangGraph JS agent in TypeScript that you can test without an API key: a graph with one tool, memory per conversation, node by node streaming, and a local server you can open in LangGraph Studio. Plan on about 45 minutes. The libraries are MIT licensed, so the only running cost is model tokens, and the test suite spends none. It's for Node and TypeScript developers who have read the Python tutorials and want the same thing in their own stack.
I ran every command below on October 11, 2026 against @langchain/langgraph 1.4.21, Node 22 and TypeScript 7.0.2, and pasted the real output. One limit to state up front: there was no Anthropic key on the machine during that run, so the agent was exercised with a scripted stand in model, not live Claude calls. That is also the testing pattern I recommend in Step 5, so you'll see exactly how it works.
Before you start
- Node 20 or newer.
@langchain/core1.2.17 declaresnode >=20in its package.json. I used Node 22. - An Anthropic API key for Step 6. Any chat model with function calling works; swap the provider package if you use another one.
- Comfort with async TypeScript and zod. No prior LangGraph knowledge needed.
- A free LangSmith API key for the Studio UI in Step 8. The docs list it as a prerequisite; the dev server itself started without one in my run.
If you're still deciding whether you need a graph library at all, read how I choose between LangChain and LangGraph first. The short version: reach for LangGraph when the agent loops, branches or has to pause and resume.
Step 1: Create a LangGraph JS project and pin the versions
Start with a plain ESM project. LangGraph JS ships as @langchain/langgraph, and the official install page pairs it with @langchain/core. The model provider is a separate package.
mkdir order-agent && cd order-agent
npm init -y
npm pkg set type=module
npm install @langchain/langgraph@1.4.21 @langchain/core@1.2.17 @langchain/anthropic@1.5.12 zod@4.6.5
npm install -D typescript tsx @types/node
Pin the versions. This ecosystem ships often (npm shows the package last changed on October 7), so an unpinned install a few weeks from now may not match the code below.
Add a tsconfig.json:
{
  "compilerOptions": {
    "target": "ES2022",
    "module": "NodeNext",
    "moduleResolution": "NodeNext",
    "strict": true,
    "skipLibCheck": true,
    "noEmit": true
  },
  "include": ["src"]
}
You should see @langchain/langgraph@1.4.21 in npm ls --depth=0. With NodeNext, relative imports need the .js extension even in .ts files; leave it off and tsc stops with error TS2835.
Step 2: Define the state your nodes share
A LangGraph graph is a set of functions that read one shared state object and return partial updates. In LangGraph JS, the current way to declare that state is StateSchema, which the quickstart uses. Older tutorials use Annotation.Root. It still exists, but don't mix the two in one graph.
Create src/graph.ts and start with the state:
import {
  StateGraph, StateSchema, MessagesValue, ReducedValue, MemorySaver,
  START, END, type GraphNode, type ConditionalEdgeRouter,
} from "@langchain/langgraph";
import { AIMessage, SystemMessage, ToolMessage } from "@langchain/core/messages";
import type { BaseChatModel } from "@langchain/core/language_models/chat_models";
import { tool } from "@langchain/core/tools";
import * as z from "zod";

export const AgentState = new StateSchema({
  messages: MessagesValue,
  llmCalls: new ReducedValue(z.number().default(0), {
    reducer: (current, update) => current + update,
  }),
});
Two channels. messages appends instead of overwriting, so each node returns only its new messages. llmCalls uses a reducer that adds, which gives you a free per thread counter of model calls. Keep one in every agent. It's the first number to check when a bill jumps.
Step 3: Write the tool with a zod schema
Tools are plain async functions plus a schema the model reads. The description is part of your prompt, so write it for the model, with an example value.
const ORDERS: Record<string, { status: string; total: number }> = {
  "A1001": { status: "shipped", total: 129 },
  "A1002": { status: "processing", total: 58 },
};

const getOrder = tool(
  async ({ orderId }) => {
    const order = ORDERS[orderId];
    return order ? JSON.stringify({ orderId, ...order }) : `No order ${orderId}`;
  },
  {
    name: "get_order",
    description: "Look up an order's status and total by its ID, for example A1001",
    schema: z.object({ orderId: z.string().describe("The order ID") }),
  }
);

export const tools = [getOrder];
const toolsByName = Object.fromEntries(tools.map((t) => [t.name, t]));
Return a string the model can read, and return a clear miss ("No order A9999") instead of throwing. In this graph, runTools calls the tool directly, so a throw escapes the node and stops the run. A readable miss lets the model recover and ask the user for a correct ID.
Step 4: Add the model node, the tool node and the router
This is the agentic loop: call the model, run any tools it asked for, and go back to the model until it answers without a tool call.
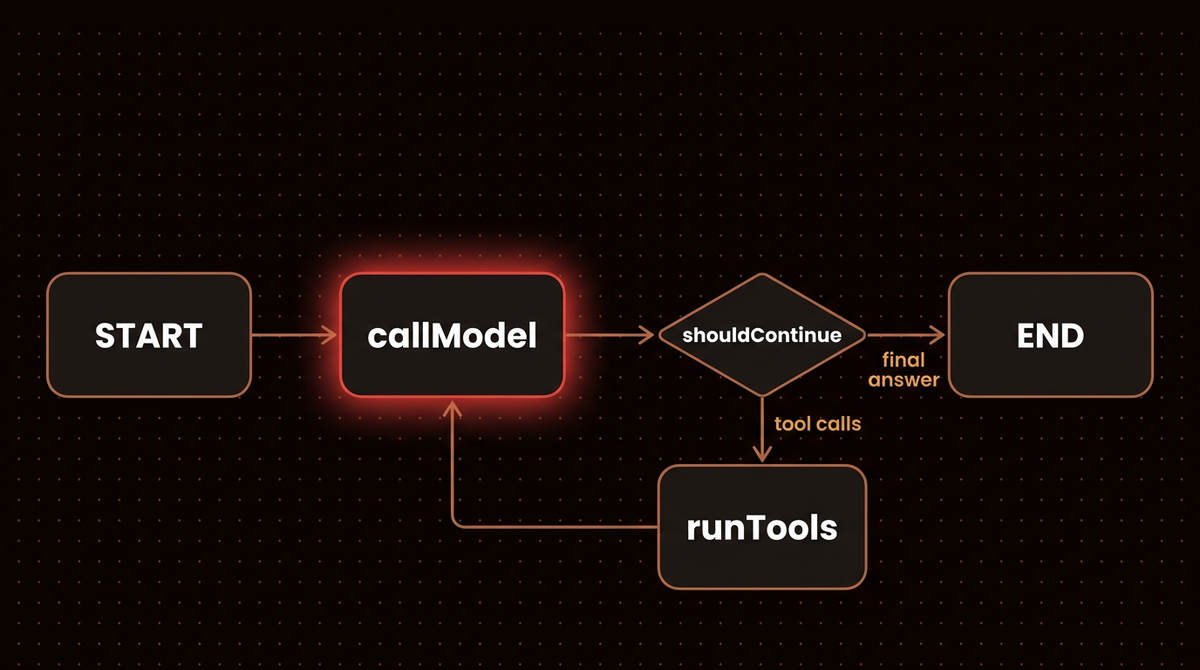
Notice that buildGraph takes the model as an argument. Step 5 depends on this.
export function buildGraph(model: BaseChatModel) {
  const modelWithTools = model.bindTools!(tools);

  const callModel: GraphNode<typeof AgentState> = async (state) => {
    const response = await modelWithTools.invoke([
      new SystemMessage("You answer order questions. Use get_order for any order ID."),
      ...state.messages,
    ]);
    return { messages: [response], llmCalls: 1 };
  };

  const runTools: GraphNode<typeof AgentState> = async (state) => {
    const last = state.messages.at(-1);
    if (!last || !AIMessage.isInstance(last)) return { messages: [] };
    const results: ToolMessage[] = [];
    for (const call of last.tool_calls ?? []) {
      results.push(await toolsByName[call.name].invoke(call));
    }
    return { messages: results };
  };

  const shouldContinue: ConditionalEdgeRouter<{
    InputSchema: typeof AgentState;
    Nodes: "runTools";
  }> = (state) => {
    const last = state.messages.at(-1);
    if (last && AIMessage.isInstance(last) && last.tool_calls?.length) {
      return "runTools";
    }
    return END;
  };

  return new StateGraph(AgentState)
    .addNode("callModel", callModel)
    .addNode("runTools", runTools)
    .addEdge(START, "callModel")
    .addConditionalEdges("callModel", shouldContinue, ["runTools", END])
    .addEdge("runTools", "callModel");
}

export function compileAgent(model: BaseChatModel) {
  return buildGraph(model).compile({ checkpointer: new MemorySaver() });
}
Passing a tool call object to tool.invoke returns a ready made ToolMessage with the right tool_call_id, so you never build one by hand. Run npx tsc -p . now. On TypeScript 7.0.2 with strict on, this file compiled with zero errors.
Step 5: Test the graph without an API key
Your routing, tool wiring and memory are ordinary code, so test them like ordinary code, without paying for a single token. Because the graph module never constructs a model, a test can hand it a scripted one.
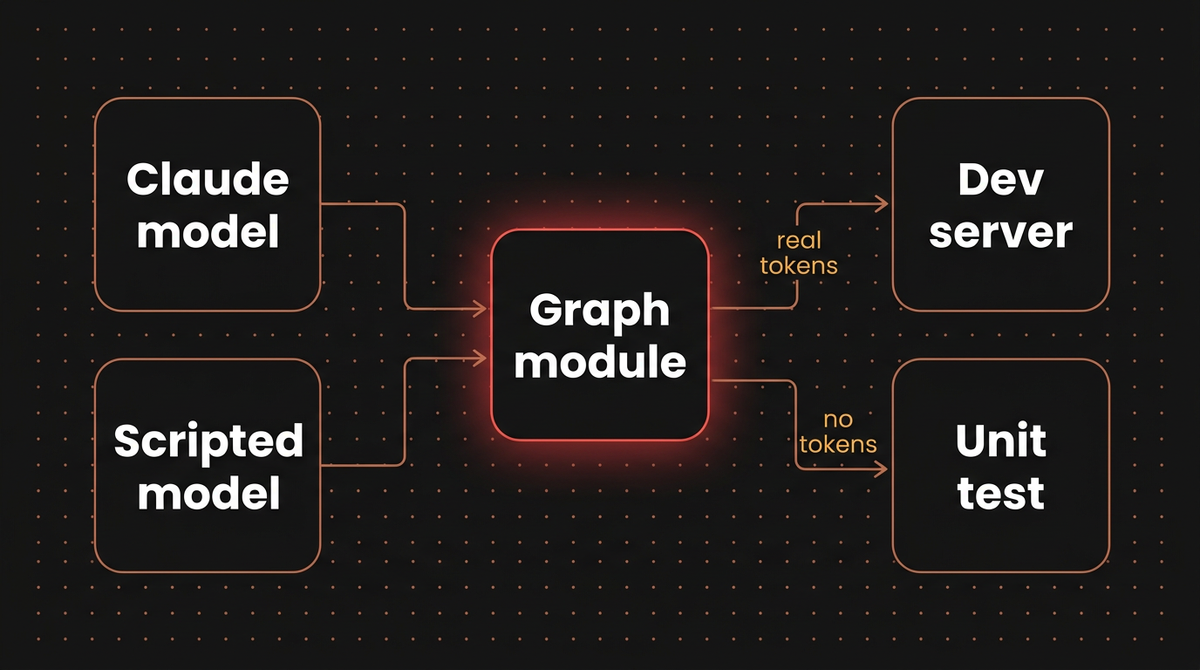
Create src/test.ts:
import { AIMessage } from "@langchain/core/messages";
import { compileAgent } from "./graph.js";

function scriptedModel(replies: AIMessage[]) {
  let i = 0;
  const m: any = { bindTools: () => m, invoke: async () => replies[i++] ?? new AIMessage("done") };
  return m;
}

const agent = compileAgent(scriptedModel([
  new AIMessage({
    content: "",
    tool_calls: [{ type: "tool_call", id: "call_1", name: "get_order", args: { orderId: "A1001" } }],
  }),
  new AIMessage("Order A1001 has shipped. The total was $129."),
  new AIMessage("You asked about order A1001."),
]));

const config = { configurable: { thread_id: "customer-42" } };
const first = await agent.invoke({ messages: [{ role: "user", content: "Where is order A1001?" }] }, config);
for (const m of first.messages) console.log(`${m.type}: ${m.content}`);
console.log("llmCalls:", first.llmCalls);

const second = await agent.invoke({ messages: [{ role: "user", content: "Which order did I ask about?" }] }, config);
console.log("messages in thread:", second.messages.length, "llmCalls:", second.llmCalls);
Run it with npx tsx src/test.ts. This is the output I got:
human: Where is order A1001?
ai:
tool: {"orderId":"A1001","status":"shipped","total":129}
ai: Order A1001 has shipped. The total was $129.
llmCalls: 2
messages in thread: 6 llmCalls: 3
The tool ran with the right argument, the loop went back to the model once, and the second turn on the same thread_id came back with all six messages, so the short term memory works. The counter climbed from 2 to 3 across turns because the checkpointer restored it too.
Warning: include type: "tool_call" in hand built tool calls. My first run left it out and failed with ToolInputParsingException: Received tool input did not match expected schema. Without that field, tool.invoke treats the whole object as the tool's input and finds no orderId at the top level.
Step 6: Connect Claude
Now give the graph a real model. Put it in its own file, src/agent.ts:
import { ChatAnthropic } from "@langchain/anthropic";
import { buildGraph } from "./graph.js";

const model = new ChatAnthropic({ model: "claude-sonnet-5-5" });

export const graph = buildGraph(model).compile();
Create a .env file at the project root containing ANTHROPIC_API_KEY= followed by your key, as the ChatAnthropic integration page describes. claude-sonnet-5-5 is the current Sonnet ID on Anthropic's models page.
To talk to Claude from a script, add src/run.ts:
import { ChatAnthropic } from "@langchain/anthropic";
import { compileAgent } from "./graph.js";

const agent = compileAgent(new ChatAnthropic({ model: "claude-sonnet-5-5" }));

const result = await agent.invoke(
  { messages: [{ role: "user", content: "Where is order A1001?" }] },
  { configurable: { thread_id: "customer-42" } }
);
console.log(result.messages.at(-1)?.content);
Run it with npx tsx --env-file=.env src/run.ts. The flag matters: plain tsx does not read .env, and in my run the same script saw no key without it. With a valid key you get the model's answer about A1001. With a wrong key you get AuthenticationError: 401 and invalid x-api-key, which is what I got, since my machine had no working key that day.
This export compiles without a checkpointer on purpose. The LangGraph server in Step 8 attaches its own persistence, and the checkpointer docs say it handles checkpointing for you there. For a script or your own Express route, use compileAgent(model) from Step 4 instead.
There's a second reason for the split. new ChatAnthropic() throws Anthropic API key not found the moment the module loads if the key is missing. Had the model lived in graph.ts, the zero token test from Step 5 would crash on import in CI.
Step 7: Stream the run node by node
A support chat UI shouldn't sit blank while the agent calls a tool. stream with streamMode: "updates" yields one chunk per node as it finishes. Append this to src/test.ts; it builds a fresh agent because the first scripted model has used up its replies:
const streamer = compileAgent(scriptedModel([
  new AIMessage({ content: "", tool_calls: [{ type: "tool_call", id: "c2", name: "get_order", args: { orderId: "A1002" } }] }),
  new AIMessage("A1002 is still processing."),
]));

for await (const chunk of await streamer.stream(
  { messages: [{ role: "user", content: "Status of A1002?" }] },
  { configurable: { thread_id: "t2" }, streamMode: "updates" }
)) {
  console.log("update from:", Object.keys(chunk).join(","));
}
update from: callModel
update from: runTools
update from: callModelThat middle line is your cue to show "Checking your order..." in the UI. The streaming docs list the other modes, including messages for token by token output. They also recommend the newer event streaming API for new apps since LangGraph v1.2, so look at it before you build a large UI on stream modes.
Step 8: Run it on the local server and open Studio
Install the CLI as a dev dependency, as the local server guide shows, and add a langgraph.json at the project root:
npm install -D @langchain/langgraph-cli{
"node_version": "22",
"graphs": { "agent": "./src/agent.ts:graph" },
"env": ".env"
}The env entry points at the .env file from Step 6, so create it even if your key is already exported in your shell. Then start the server with npx @langchain/langgraph-cli dev. My run printed Registering graph with id 'agent' and then Server running at ::1:2024. A request to http://localhost:2024/ok returned {"ok":true}, and POST /assistants/search listed the agent graph. The banner also prints a Studio URL; open it to click through the same loop you tested in Step 5. I covered Studio itself in how to set up LangGraph Studio and debug an agent.
The dev server keeps state in memory and the banner says it is meant for development and testing. Don't point real users at it.
When createAgent is enough
Everything above is the explicit version. If your agent is exactly "model plus tools in a loop", createAgent from the langchain package builds the same shape in one call, per the LangChain agents docs:
npm install langchain@1.5.16import { createAgent } from "langchain";
import { MemorySaver } from "@langchain/langgraph";
import { tools } from "./graph.js";
const agent = createAgent({
model: "anthropic:claude-sonnet-5-5",
tools,
systemPrompt: "You answer order questions.",
checkpointer: new MemorySaver(),
});On my machine this built a graph with the nodes model_request and tools, and it built without a key, because a string model ID is resolved later. Here's how I decide:
| Situation | Use | Why |
|---|---|---|
| Model plus tools, nothing else | createAgent | Less code, and middleware hooks when you need them |
| A step must run on every turn, like a policy check or a database write | StateGraph | You own the edges, so the step can't be skipped |
| Branches that are business rules, not model choices | StateGraph | Routing in code is testable, as Step 5 showed |
| Human approval mid run | Either, with a checkpointer | Both accept a checkpointer, which human approval needs |
| Team already writes Python | LangGraph Python | Same concepts, your team's language |
My rule: start with createAgent and move to a hand written graph the first time you catch yourself writing a prompt that begs the model to always do something. That "always" belongs in an edge.
Troubleshooting
ToolInputParsingException with "expected string, received undefined". The tool got the whole tool call object as its input. Real model responses include type: "tool_call"; hand built ones in tests often don't. Add the field.
Anthropic API key not found when tests import the agent. The model is constructed at import time. Keep it out of the module your tests import, as in Steps 4 and 6.
curl http://127.0.0.1:2024/ok fails but the server says it's running. On my Mac, CLI 1.5.2 bound to the IPv6 loopback (::1), so the IPv4 address refused the connection even though the docs' sample output shows 127.0.0.1. Use localhost.
TS2835 on an import. Under NodeNext, write ./graph.js, not ./graph.
Memory vanishes after a restart. MemorySaver lives in process memory, and the checkpointer docs describe it as being for experimentation. Use @langchain/langgraph-checkpoint-postgres in production; my Postgres checkpointer guide covers the pool setup. The persistence docs add one Postgres rule: keep thread_id under 255 characters.
Going further
Pause for approval. With a checkpointer in place, you can stop before runTools and resume after a human says yes. The pattern is the same as in my human approval guide, which uses Python.
What it costs. At Sonnet 5.5's listed $2 per million input tokens and $10 per million output, here's a rough estimate for this agent. Assume about 1,200 input tokens per model call (system prompt, tool schema, history) and 150 output tokens. A turn that uses one tool makes two calls. That works out to about 0.5 cents of input and 0.3 cents of output, so roughly 0.8 cents a turn, or about $80 per 10,000 turns. Those token counts are my assumptions, not measurements. History grows every turn, and Sonnet 5.5 uses adaptive thinking, which bills extra output tokens, so log real usage from the first week before you trust any budget. The llmCalls counter from Step 2 tells you when a thread is looping more than it should.
When not to use it. If the job is one model call with structured output, LangGraph adds a dependency and a mental model for nothing. Call the provider SDK directly. And if your team writes Python, follow my Python LangGraph tutorial instead; the concepts here map one to one. The JS project itself is active, with 3.3k GitHub stars and frequent releases.
If you want one of these built and monitored for you, that's my day job: see how I build AI agents.
Frequently asked questions
Is LangGraph JS the same as LangGraph for Python?
It's the same design: a state graph of nodes and edges, checkpointers for memory, and the same server and Studio tooling. The package is @langchain/langgraph on npm, and names differ in places, such as MemorySaver in JS where Python examples use InMemorySaver. Code doesn't port line for line, but the concepts carry over.
Do I need LangChain to use LangGraph JS?
No. The official install page lists only @langchain/langgraph and @langchain/core, and says you can call models and define tools however you like. You'll usually add a provider package such as @langchain/anthropic for convenience. The full langchain package is only needed for createAgent.
Which Node version does LangGraph JS need?
Use Node 20 or newer. @langchain/langgraph 1.4.21 itself declares Node 18 or newer, but @langchain/core 1.2.17, which it depends on, declares Node 20 or newer, as do langchain and @langchain/anthropic. Everything in this guide ran on Node 22.
Is LangGraph JS free?
The library is MIT licensed, so building and running it yourself costs nothing beyond model tokens and your own hosting. The local server guide lists a free LangSmith API key as its prerequisite, and Studio needs it; the dev server itself started without one in my run. Managed hosting is a LangSmith deployment, which the server banner points you to for production.
Should I use StateGraph or createAgent?
Use createAgent when the agent is a model calling tools in a loop and nothing else. Switch to StateGraph when a step must always run, routing depends on business rules, or you want to test control flow in isolation. Both produce a LangGraph graph, so moving later isn't a rewrite of your tools.
Published
October 11, 2026
Category
AI Agents
Jahanzaib Ahmed
AI Systems Engineer & Founder
AI Systems Engineer with 126 production systems shipped. I run AgenticMode AI (AI agents, RAG systems, voice AI) and ECOM PANDA (ecommerce agency). I build AI that works in the real world for businesses across home services, healthcare, ecommerce, SaaS, and real estate.
Related articles
How to Use the LangGraph CLI to Build and Run an Agent Server in Docker
Every LangGraph CLI command run for real on version 0.4.33, from langgraph new to a Docker image, plus the two traps the docs skip: a build that copies your .env file and a Python 3.11 default base image.
How toAI AgentsLangGraph
How to Use MCP Servers in LangGraph (and Serve a Graph as One)
Connect a LangGraph agent to MCP servers with langchain.mcp, then serve your own graph over /mcp. Every example was run on LangGraph 1.2.14, with the old adapters package covered too.
How toAI AgentsLangGraph
How to Inspect LangGraph Deep Agents: What create_deep_agent Adds
See what LangGraph deep agents add to a graph, tested offline on deepagents 0.7.22: the default tools, files in state, subagents, approvals, and the planning tool that is now opt in.
How toAI AgentsLangGraph